使用 Travis CI 自動部署 GitHub Pages

前言

先前看到了程式人就該有個部落格,想想這個主意不錯,之前有在 Blogger 及 Logdown 零星寫了幾篇文章,也曾經想過自己架靜態或動態網站,只是一直沒有去做,看完這篇讓我更有動力去做這件事。研究一陣子後我選擇直接利用 Github pages 來發佈網站,於是開始調查 StaticGen 上排名較高的幾個,而最後挑選了 Hexo:是台灣人寫的,而且是 javascript。

自己完成 Hexo 初步設定,產生第一版頁面後不久就遇到兩個問題:

  1. 能不能將每次都要發佈的這個動作自動化。
  2. 如果我換到其他電腦上,而其他電腦可能沒有 Hexo 時會很不方便,可能要選擇安裝一次 node.js 及 hexo,甚至根本沒安裝權限;若是能直接利用 GitHub 線上編輯 markdown 文件就能產生的話有多棒。

因為這兩點,我決定開始我的 Travis CI 初體驗。

關於 Travis CI

簡單來說,持續整合 (Continuous integration,縮寫為 CI)是在開發過程中,有任何變更都自動且持續的整合到目前的版本中。整合包含測試及發佈,可根據自訂的測試內容產生可視化的結果,方便開發人員快速找到問題所在,並且在測試通過後自動執行已撰寫的腳本,以達到自動發佈的功能。要達到持續整合,需有一個伺服器專門監聽程式版本的改動,一旦有變動就執行事先撰寫的測試及部署腳本。

Travis CI 提供在 GitHub 上的任何公開的 repo 都可以免費的使用 CI 服務,Travis CI 與 GitHub 的適性很好(也只提供使用 GitHub 帳號登入),廣受 GitHub 上使用,因此在這裡也使用 Travis CI 所提供的服務來產生靜態網站。

初次接觸 CI 可以先從官方提供的範例檔開始:Travis CI for Complete Beginners,以便能有一些基礎概念,接著再開始挑選 Getting started 中的項目學習設定與操作。

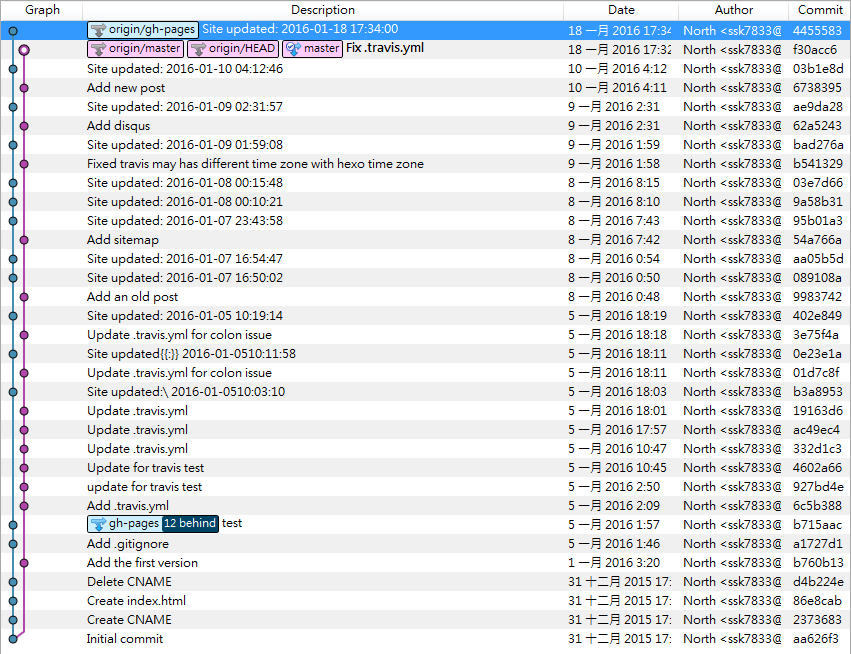
我的目標很明確,想要弄出在同一個 repo 下,一個 branch 是放 source code 的 master,另一個 branch 則是發佈用的 gh-pages。每當我 master 有更新時 gh-pages 也會自動透過 Travis CI 更新,如下圖,經過幾次測試後終於成功,最後 branch 的點呈現交錯成長:
branch

給予 Travis CI push 的權限

由於發佈到 gh-pages 要交給 Travis CI 處理,需要 GitHub 帳號的驗證,而在 public repo 下不可能直接把密碼直接放在 source 中,因此在這裡選擇 GitHub 所提供的 Personal access tokens 來處理權限的問題,用 Personal access token 的好處在於是個人創建的,可以隨時刪除 token 以取消存取權限,再加上 Travis CI 在文件中提到的 Encryption keys 來處理敏感資料,通過環境變數的方式傳遞給腳本,以避免密碼及 token 公開出來。

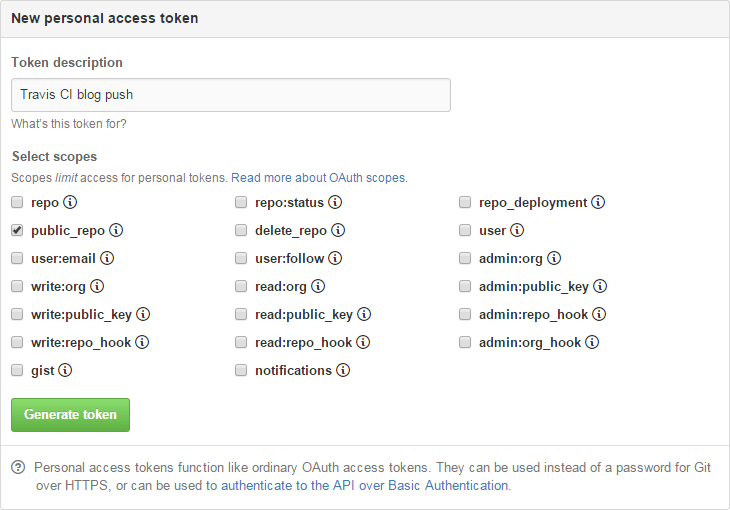
首先先產生一個 access token,因為目的只有讓 Travis CI 可以讀取 public repo,因此勾選 public repo 即可。
personal access token

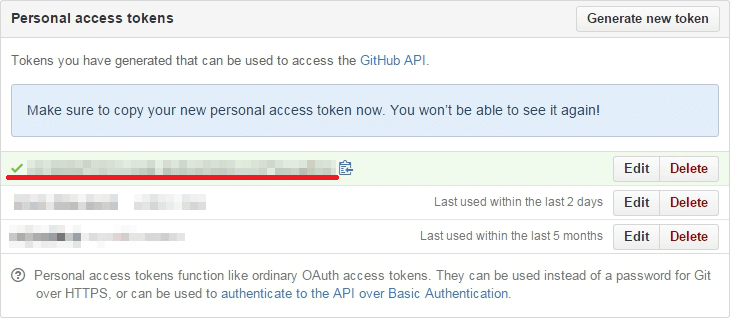
接著先將產生的 token 妥善複製,未來只能 regenerate 一組新的 token,再也無法從 GitHub 調出目前這組。
generated token

接著利用 Travis CLI 來處理敏感資料,較方便的方式是利用 ruby 的 gem 來安裝 Travis CLI:

1
gem install travis

安裝完畢後,接著到想設定 Travis CI 的 repo 目錄中執行 travis login 來驗證身分,之後執行 travis init,會先詢問使用的語言,且產生 .travis.yml,接著在同一目錄下執行此指令,記得將 <Personal Access Token> 取代成先前複製的那組:

1
travis encrypt 'GIT_NAME="North" GIT_EMAIL=ssk7833@gmail.com GH_TOKEN=<Personal Access Token>' --add

即可看到在 .travis.yml 中多了

1
2
3
env:
global:
secrue: "long secure base64 string"

這一串將在每次 CI 進行時設定環境變數,這邊環境變數即可在接下來的腳本中使用。

設定 .travis.yml 檔

編輯 .travis.yml 前,可以先閱讀一下 Travis CI 的 Build Lifecycle,以下是我粗略的設定:

1
2
3
4
5
6
7
8
9
10
11
12
13
14
15
16
17
18
19
20
21
22
23
24
25
language: node_js

node_js:
- "4.0"

env:
global:
secure: "long secure base64 string"

install:
- npm install

script:
# Set Git config
- git config --global user.name "$GIT_NAME"
- git config --global user.email "$GIT_EMAIL"
- git config --global push.default simple
- git clone --depth 1 --branch gh-pages https://$GH_TOKEN@github.com/ssk7833/blog public
# Generate Hexo static pages

- npm run generate
- cd public
- git add -A .
- MESSAGE=`date +\ %Y-%m-%d\ %H:%M:%S`
- git commit -m "Site updated:$MESSAGE"
- git push --quiet

node.js 的套件 dependencies 都已先用 package.json 存下,因此在 install 的部分只需使用 npm install;在 script 中完成部分指令,但因為沒特殊需求,只有設定 git 及產生靜態頁面,因此讓它一路到底。

注意:git push 時一定要加 --quiet,否則先前設定的 Personal Access Token 將會印出,這樣就失去加密意義了。

結果可以在 Travis CI 的網頁上看到,可以瀏覽各次的狀況,像我最近的 push 結果及先前測試的失敗結果都可以在 Build history 中瀏覽到。

在 GitHub 上發佈/編輯

若是設定無誤,接下來要發佈或編輯文章即可直接利用 GitHub 網頁版來作編輯,不需要擔心作業系統沒有安裝相關環境而無法發佈或編輯文章囉!
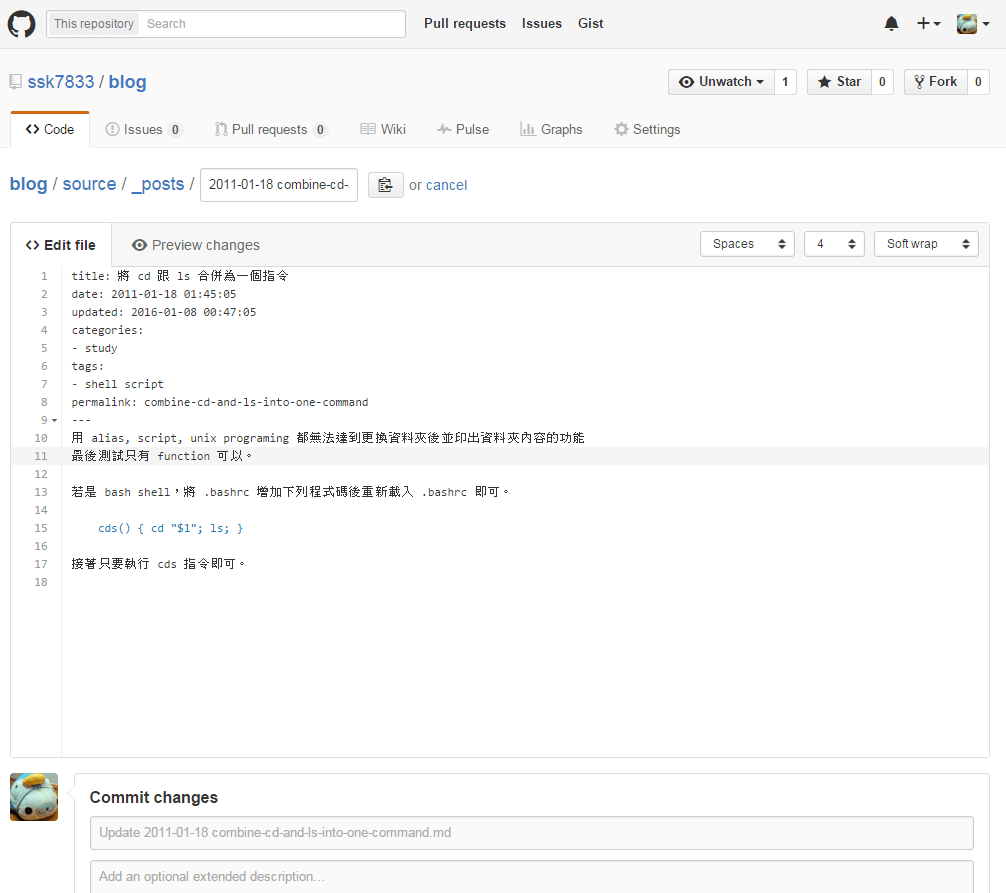
edit post

UPDATE:發現 Travis CI 發佈的結果可能會跟實際時間對不起來,如圖:

time zone incorrect

後來發現是因為我在 Hexo 中設定了時區為 Asia/Taipei,而 Travis CI 所提供的機器時區不一樣而造成的,將 Travis CI 一樣設定為 Asia/Taipei 即可解決問題。

1
2
before_install:
- export TZ=Asia/Taipei

這是我最後的 .travis.yml 設定

參考資料:

  1. 用 Travis-CI 生成 Github Pages 博客
  2. When Hexo Meets GitHub Pages and Travis CI plus Raspberry Pi

HTML5 fullscreen API 將 iframe 以全螢幕顯示

最近因為有把 iframe 內容以全螢幕顯示的需求,因此研究了一下 HTML5 fullscreen API。已有現成的 library 可以用如 screenfull.jsBigScreen,但大致上並不難,因此我選擇了純 javascript 來撰寫看看。

要全螢幕其實並不難,只要呼叫 requestFullscreen() 即可做到,以下是簡易範例:

1
2
3
4
5
6
7
8
9
10
11
12
13
14
15
16
17
18
19
20
21
22
23
24
25
26
27
var button = document.querySelector('#container .button');
button.addEventListener('click', fullscreen);

function fullscreen() {
// check if fullscreen mode is available
if (document.fullscreenEnabled ||
document.webkitFullscreenEnabled ||
document.mozFullScreenEnabled ||
document.msFullscreenEnabled) {

// which element will be fullscreen
var iframe = document.querySelector('#container iframe');
// Do fullscreen
if (iframe.requestFullscreen) {
iframe.requestFullscreen();
} else if (iframe.webkitRequestFullscreen) {
iframe.webkitRequestFullscreen();
} else if (iframe.mozRequestFullScreen) {
iframe.mozRequestFullScreen();
} else if (iframe.msRequestFullscreen) {
iframe.msRequestFullscreen();
}
}
else {
document.querySelector('.error').innerHTML = 'Your browser is not supported';
}
}

此範例即可讓當所選擇的 #container .button 被點擊時,讓 #container iframe 全螢幕。

但因為 iframe 的內容並非我可以控制的,有些 iframe 的內容沒有處理 RWD,因此當頁面縮放時可能會呈現未預期的效果,如:ぶつからないように動くビークル(找了一下 codepen 才找到一個可用範例)。要做到這點,我目前選擇當 iframe 被全螢幕時則重新載入一次,當然,當 iframe 從全螢幕離開時也會再 resize 一次,因此也要注意離開全螢幕時也得處理。

1
2
// reload
iframe.src = iframe.src

原本我認為應將重新載入寫在 request fullscreen 之後,而當觸發 keydown event 時再觸發一次重新載入,後來發現在全螢幕時按下 ESC 時 keydown event 都不會被觸發(chrome, firefox),而按下 F11 則是 Firefox 會觸發而 Chrome 不會,因此認為這應該不是個好寫法。

後來在 How to Use the HTML5 Full-Screen API (Again) 發現有 fullscreenchange event 可以用,因此也改用這個,原本放在全螢幕後的重新載入也改成放於 event listener 內,程式碼也簡潔多了!

1
2
3
4
5
6
7
8
9
10
11
12
13
14
15
16
17
18
19
20
21
22
23
24
25
26
27
// when you are in fullscreen, ESC and F11 may not be trigger by keydown listener.
// so don't use it to detect exit fullscreen
document.addEventListener('keydown', function (e) {
console.log('key press' + e.keyCode);
});

// detect enter or exit fullscreen mode
document.addEventListener('webkitfullscreenchange', fullscreenChange);
document.addEventListener('mozfullscreenchange', fullscreenChange);
document.addEventListener('fullscreenchange', fullscreenChange);
document.addEventListener('MSFullscreenChange', fullscreenChange);

function fullscreenChange() {
if (document.fullscreenEnabled ||
document.webkitIsFullScreen ||
document.mozFullScreen ||
document.msFullscreenElement) {
console.log('enter fullscreen');
}
else {
console.log('exit fullscreen');
}
// force to reload iframe once to prevent the iframe source didn't care about trying to resize the window
// comment this line and you will see
var iframe = document.querySelector('iframe');
iframe.src = iframe.src;
}

以下為測試的範例,可以試著把 iframe.src = iframe.src; 註解掉,即可看到改造前後的差異:

See the Pen Fullscreen API on iframe by North (@ssk7833) on CodePen.

參考資料:
ぶつからないように動くビークル
Using fullscreen mode - Web APIs | MDN
How to Use the HTML5 Full-Screen API (Again) - SitePoint

Facebook Graph API 取得大頭貼照

要取得大頭貼照,如果使用 API request ,加上 picture 即可得到大頭貼照,如:me?fields=id,name,picture,即可在回傳的 JSON 中取得圖片的位址,但這時取回來的圖片會比正常大小還要小,而且此方法還需要 access_token。

要取得不同大小的大頭貼照,有個更輕鬆的方法:http://graph.facebook.com/{id}/picture?type=normal 直接使用此網址,將 id 換成想呈現的 userId 即可,此網址將會 redirect 到對應的圖片位址,且此方法不需要 access_token。

在這個網址中,type 可為 small, normal, album, large, square,分別為不同解析度的照片大小。

以 Facebook 的創始人 Mark Zuckerberg 為例,userId 為 4,則要顯示的網址如下:
50*50:
http://graph.facebook.com/4/picture?type=small
Small
http://graph.facebook.com/4/picture?type=album
Album
http://graph.facebook.com/4/picture?type=square
Square

100*100:
http://graph.facebook.com/4/picture?type=normal
Normal

200*200:
http://graph.facebook.com/4/picture?type=large
Large

不能理解的是為什麼 small, album, square 所得到的大小都一樣,還不知道差在哪。

Facebook Graph API 回傳指定語言/地區化姓名

玩 Facebook Graph API 玩了一陣子才發現回傳的姓名總是是英文的,才想到若是有回傳中文姓名的需求時該怎麼辦,如此下去一找才發現關鍵字是 Language-specific name,而要如何在 Facebook Graph API 中顯示為中文則可以參考這篇中的 locale:Modifying API Requests

其實只要在 API request 中加上 &locale=zh_TW 即可得到中文姓名,如:me?fields=id,name&locale=zh_TW,只是有趣的是我稍微測了一下 locale 給以開頭 en_ 以外的任何值都會取得中文名稱,還以為預設會以英文為主。

使用 Parse.com Cloud Code Hosting 進行 Facebook 登入存取 3

繼上一篇成功截取出使用者資料後,發現除了基本資料外,朋友、按讚的資訊等資料其實都抓不出來,原因是因為沒有給予 app 存取這些資訊的權限。要求權限的話可以透過 OAuth 來索取 access token ,其範例網址如下:

https://www.facebook.com/dialog/oauth?client_id={appId}&redirect_uri={redirectURI}

Profile
Profile details

這是一個截取基本權限的網址,appId 指的是每一個 app 獨立的 ID,而 redirectURI 是當 OAuth 通過後,會送發一串 code 到這個 redirectURI 去,而若需要要求其他權限,可以增加 scope 屬性如下:

https://www.facebook.com/dialog/oauth?client_id={appId}&redirect_uri={redirectURI}&scope={accessPermissions}

這個 scope 以逗號作為分隔,填在裡面的將會在 Facebook dialog 中要求權限。

Profile with friends
Profile with friends details

講了這麼多,但以第一篇中使用了parse-facebook-user-session該怎麼修改呢?稍微翻了它的 source code 後發現它在實作上並沒有保留 scope 欄位,因此我便把 scope 加上去了,可以由此瀏覽:parse-facebook-user-session
UPDATE:原 repository 已經將此功能 merge上 去,直接使用原本的即可

使用方式的話則與先前的沒什麼差別,只是可以選擇多填一個 scope 欄位,範例如下:

1
2
3
4
5
6
app.use(parseFacebookUserSession({
clientId: 'YOUR_FB_CLIENT_ID',
appSecret: 'YOUR_FB_APP_SECRET',
redirectUri: '/login',
scope: 'user_friends,user_likes', // 要求friends與like資訊
}));

至於有哪些權限可以要求,可以當https://developers.facebook.com/tools/explorer/中,點選 Get Access Token 來參考,並且在下面做測試。

不過要注意的有像是 user_friends 這項,如果在 API v2.0 以上的版本上要求資訊的話,只會列出同樣有授權此 app 的好友出來,開了幾個 test users 測試的確如此:

很可憐沒有朋友授權此 APP:

1
2
3
4
5
6
7
8
9
10
{
"id": "104342733239984",
"name": "Hello world",
"friends": {
"data": [],
"summary": {
"total_count": 1
}

}

}

可以看到 summary 中,total_count 為 1,但 data 中無資料。

有朋友也授權此 APP:

1
2
3
4
5
6
7
8
9
10
11
12
13
14
15
16
17
18
19
20
21
22
{
"id": "1421116644879628",
"name": "Doraemon Cat",
"friends": {
"data": [
{
"name": "Open Graph Test User",
"id": "1414470195545509"
},

{
"name": "Monkey D Luffy",
"id": "100347703641647"
}

],

"paging": {
"next": "https://graph.facebook.com/1421116644879628/friends?limit=25&offset=25&__after_id=enc_AdAMpWdRxSLZAvND6bEd0htyyGsZAZBvzP6jzoAIZBKS9EiBSndZCNZC3S1AC5TEYchbuuBSV0xvg7ziwO4Cdt843yZApF"
}
,

"summary": {
"total_count": 2
}

}

}

可以看到此 test user 有兩個朋友也都有安裝此 app。

至於怎麼得到 test user 的 access token,我是利用 Parse.com 的 API Console,Endpoint 填入 users 且 Use Master Key 改成 Yes,send request 後即可在 response 中看到 access token,即可複製此 token 到 https://developers.facebook.com/tools/explorer/ 中做測試,如下圖。

API console